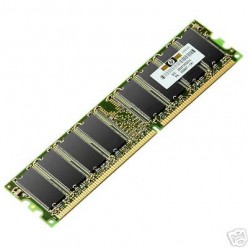
RAM chip

Cleaning of RAM chip
Here's a way to solve a problem related to computers. Sometimes,
a computer refuses to start and asks to insert a booting device to
boot. Sometimes this happens when the RAM chip doesn't work because it
may be just loosely fitted or covered with dust. Well, actually there is
no need to call in a computer
serviceman and ask him to repair it. Here's a way to solve that problem. Just follow these simple steps and you can save money spent on the RAM chip and time needed for a repairman to come and repair your computer. It can also help you learn to clean your RAM chip if it's dusty.
serviceman and ask him to repair it. Here's a way to solve that problem. Just follow these simple steps and you can save money spent on the RAM chip and time needed for a repairman to come and repair your computer. It can also help you learn to clean your RAM chip if it's dusty.
1. If there are any gadgets or devices that are connected to the
CPU like pen drives, USB data cables, etc., remove them. Switch off
your computer and remove the main power plug from its socket on the
wall.
2. Remove all the plugs and wires behind the CPU. Keep account
of the way the wires were plugged so that you don’t insert the wrong
wires in the wrong place after repairing. Keep the CPU on such a place
that it is comfortable for you to repair it (my suggestion, on the
floor/table). On one side of the CPU, you can find few holes on it. Keep
the CPU gently on the table/floor such that the side with the holes is
facing upwards and the backside is facing you.
3. Take a suitable screwdriver and start removing the screws on
side of the CPU with holes on it that is now facing upwards. There will
be few screws to remove. After removing the screws, keep them carefully
beside you. Now remove that side gently and softly by sliding it away
from the CPU. After sliding it for a few inches, take it up and place it
down nearby.
4. You can find the RAM chip (a green colored chip the length of
about 15cm as shown in the above picture) on the right upper side
locked on a slot with two lockers on two sides. Remove the lockers by
pushing them with your thumb, away from the chip. Take the chip out. Now
place the CPU back without the chip and there is no need to insert any
wires behind the CPU now.
5. When you switch on the CPU you will hear a beep sound. If you
don’t hear the beep sound the problem is with the electric circuit in
the CPU, for which you will have to do more research, which I will be
discussing in my next article. If you hear the beep sound you can assure
that the only problem with your CPU is the absence of the RAM chip.
Place the CPU back on the table/floor.
6. You can find that one of the thin edges of the chip is in
golden colour. Take an ordinary eraser and rub the golden edge on both
sides roughly and carefully. You can see that all the circuits in the
chip are present only on one side of the chip. You can see a circuit
nearest to the golden edge in a straight line. Rub that circuit little
more softly and little more carefully. After that, place it back in the
CPU and ensure that you lock the lockers tightly.
7. Close the CPU and make sure you tighten the screws properly.
Place the CPU back and connect all the wires in the right place. Now
switch on the computer and it may ask you a question on whether to
switch on the computer normally or not. Choose the ‘Start normally’
option. Now enjoy computing (computing originally means ‘a way of
calculating’).
Note: - There are chances of getting minor
electric shocks. Children below the age of 10 are advised to do this
with the supervision of an adult.
No comments:
Post a Comment